There are pros and cons in every aspect and system of climbing and abseiling. Ultimately, it is up to you to understand what these are and decide for yourself which you would like to use.
In the case of a trainee RCI instructor, we should understand all the systems and use the best systems where possible. Don’t just use one method because you were told it was the best, decide for yourself and be prepared to confidently back up your decisions with solid reasoning.
Good Practice for Abseiling
When abseiling, its good practice to extend your belay plate away from your harness using a sling.
Mainly this is to prevent your back up prusik being too close to your belay/abseil device and getting trapped or worse, held open.
Which Sling to use for Abseiling?
First and foremost, whatever sling material we use, we need to operate with extreme levels of care to ensure we don’t subject the extension to a shock loading.
I have used all 3 for extending. All types of work and all are safe when loaded statically, once you don’t subject them to a shock loading.
However, of the three options, Dyneema is most likely to break when shock loaded as it has no capacity to stretch, then Nylon, then Aramid.
With that in mind I normally use Aramid as my first choice for extending, but if you don’t have an Aramid sling, opt for Nylon, just remember the golden rule. Never shock load your slings.
Where should I connect the sling?
Just like when we tie in with the rope, put the sling around the tie in loops and not just the harness loop.
How should I connect it?
There are three common methods.
Method A is the quickest and strongest as it doesn’t tie a knot in the sling, but there is a greater risk of not clipping both ends of the sling, which would be catastrophic.
Method B gives you the option of different clip in spots due to the isolation knot(s). A further carabiner could be added to the end, which would be useful for safety on multi-pitch abseils. The girth hitch weakens a sling by up to 50%.
Method C is stronger than B and has the added bonus of allowing you to clip into any one of 4 loops and still be safe to use. Its a bit cumbersome, however.
Knots weaken slings
While knots are known to dramatically lessen the strength of a sling, let’s be realistic, as long as you never shock load the sling you won’t create a force big enough to snap it.
We exercise great caution every day when near cliff edges or when belaying climbers. So long as we treat our extended sling with the same caution and care then all of the above methods are safe.
Should I use a Prusik for back up?
With the above systems, Yes, absolutely. If I was using a gri-gri, no.
Prusik on a leg loop?
Most climbers, including myself, sometimes abseil with their device attached directly to their harness loop and the prusik loop attached to one of the legs of their harness.
The main pro is it’s quick and you don’t have to consider shock loading a sling, but the main cons are that harness leg loops aren’t designed to be loaded in this way and the prusik can get too close to the device this way.
I would expect an RCI trainee to understand, demonstrate and explain the pros and cons of all the above methods.
Purpose designed lanyards?
I have purposely not mentioned lanyards such as the Petzl Connect. While they are dynamic and designed to absorb a shock loading, I have the following personal opinions or observations on them:
- In the realms of trad climbing, I find them annoying and they can get in the way while reaching for gear on lead.
- They have a singular purpose, whereas a sling has a few purposes which allow me to carry fewer items on my harness.
- I think climbers should be able to use and be comfortable with using a sling to extend a belay plate.
- If my work routinely called for a cows tails, such as regularly operating a group abseil set up, I would use a purpose-designed lanyard.
- I think purpose-designed lanyards are an excellent choice for sports climbing.
If you decide to use a purpose-designed lanyard, you should still be familiar with making your own from a sling, in case you lose or forget it.
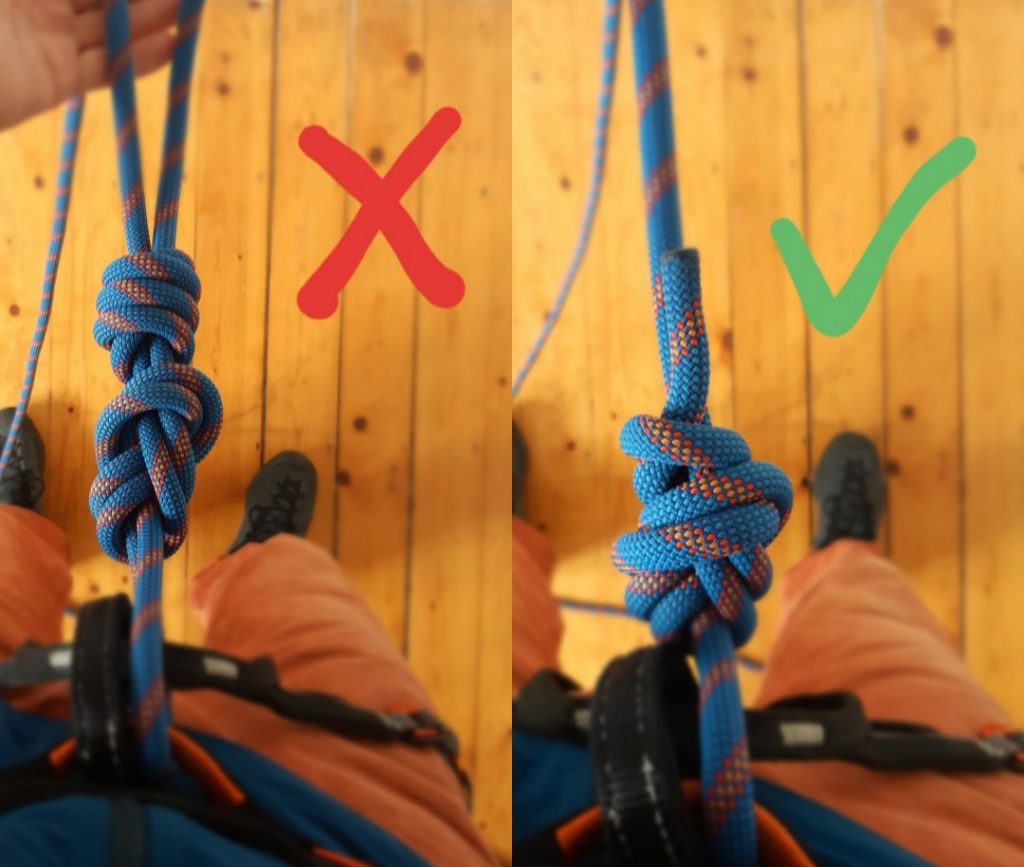
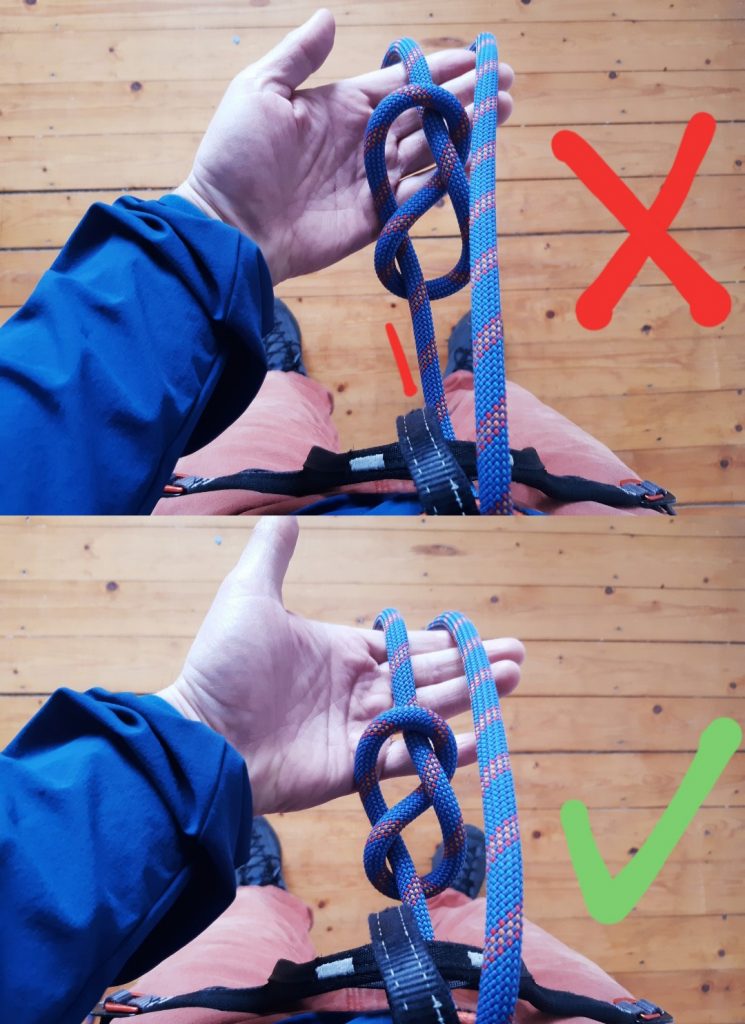
Remember to always dress and stress your knots, put a knot at the end of your abseil rope and tie a stopper knot on anchor tie ins.
Please feel free to contact me if you would like to discuss any aspect of this video or other skills.